Allure Flooring
Allure flooring is a new type of vinyl flooring. It's a vinyl plank flooring that either sticks together with a strong adhesive, that's already applied to the planks, or a click lock system similar to laminate floors.
I've used the glue together flooring in my own bathroom. I liked the fact that it could stand up to water, but more importantly it was inexpensive, looked great, and came with a 25 year warranty!
In my experience the flooring was very easy to install, the glue was sticky but not obnoxiously so, and the vinyl was easy to cut. These are important factors when considering a DIY floor. It is a very DIY friendly floor I must say.
Although I only have experience with the glue together type flooring, I imagine the click lock type is just as good, I just haven't used it yet. From the reviews I've seen about the click Allure flooring it should be a good choice as well. I believe it also comes with a 50 year warranty, and the glue together comes with a 25 year warranty.
It's very easy to cut. You really only need a good utility knife, a floor roller, and a set of tin snips. These are common tools almost all DIYers have and are inexpensive to buy if they do not. It may be possible to cut the flooring with heavy duty scissors, but I would highly recommend getting a set of quality tin snips, it will be much easier.
Another great thing about the floating Allure flooring is that it can go over surfaces that may not be totally flat. In fact the instructions say it can go over a number of floors, such as tile, hardwood, laminate, old vinyl, and many other floors. The biggest problem I come across is floors that are not flat enough for laminate, but this flooring will work just fine.
I do have to say though, this stuff is heavy. A single box has to weigh 60 lbs, which is a lot when it covers 16 square feet. So it's a good idea to get help if needed, or split the boxes and carry in only what you feel comfortable with.
Don't worry to much about the glue in the Trafficmaster flooring, the planks are separated by a sheet of, well something, that the glue doesn't stick to.
Enough of me rambling about this flooring here are some pictures on how to install the Trafficmaster Allure Flooring!
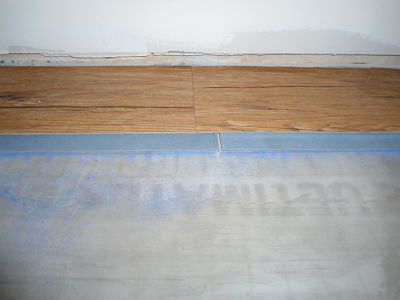
First you want to snap a chalk line to keep the flooring straight, this is very important. If you don't keep the first row as straight as possible the subsequent rows may not line up correctly. If you look closely you can see the blue chalk line in the picture below.
Just make sure to keep the seams as tight as possible throughout the entire floor. Once the floor is stuck together it doesn't want to come apart, but it will if you made a mistake. Also once it's rolled down it gets much more difficult to separate.
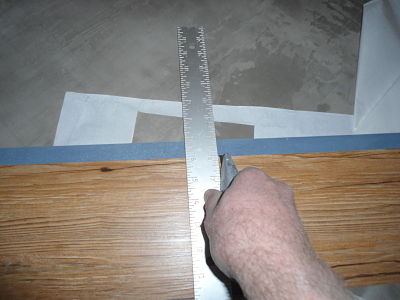
This next picture shows that you simply have to score the plank with a utility knife. You don't have to cut all of the way through the plank, just through the top layer.
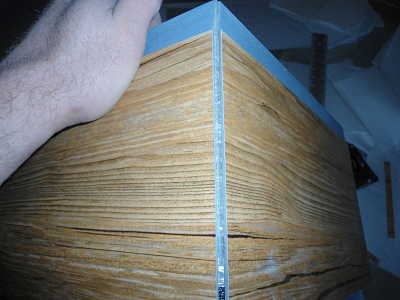
This what it looks like when it's broken along the score line made from the knife.
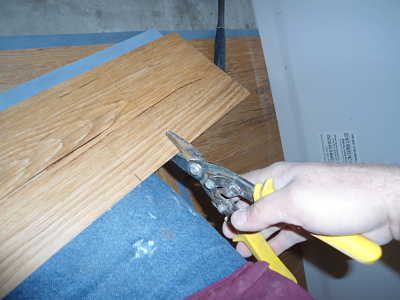
To cut odd shapes or around ducts I used a set of tin ships. They worked just fine and I had them on hand. Just use them as normal, it's a little tough to cut though but it worked fine. You can see in the picture below the duct I had to cut around, as well as my helper!

Here is the picture of cutting with tin snips.
And last but not least the picture of the completed floor.
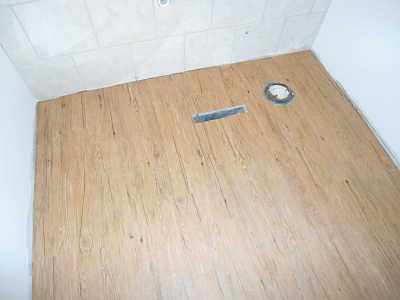
This floor only took me 30 mins to complete. I do have some experience but it shouldn't take anyone longer that 45 mins to do the same amount of flooring.
Overall it's holding up fine in my bathroom and I'm very pleased with it. It's easy to clean and looks great. Go get a sample from Home Depot and see how you like it. The floor I chose was the country pine. It looks much better than the pictures, I'm a carpenter and not a photographer after all, lol.


Copyright 2012. All rights reserved.