How To Install Ceramic Tile
How to install ceramic tile? This is a common question among the beginners in home remodeling. Installing ceramic tile isn't as hard as you may think, and the installation is pretty much the same regardless of the room your tiling. Once you install your first ceramic floor, or wall, you'll then realize how easy it actually was.
All of the steps below assume you have removed all of the trim, doors, and anything else that may get into the way of your tile installation.
Step One: Designing a Tile Backsplash
The first step in any ceramic tile installation project is choosing your design. It may be an easy decision or it may be difficult for you. It can be difficult if you really want an elaborate design with many different angles and different tiles.
No one can really point you to your perfect design, but you, after all who knows you better than yourself. But a few ideas can really get the ball rolling. This is not really about how to install ceramic tile but it's a necessary step that only you can do.
Step Two:
Next step is buying all of your tile, backerboard, thinset, grout, and tools needed for your project.
As for the tools needed, you will need a notched trowel (commonly 1/4 by 1/4 inch), sponge, 3 or more buckets, grout float, mixing paddle for thinset, drill, tile cutter and/or wet saw, level, tile spacers, rubber mallet, and a large carpenter's square. Non essential but helpful tools are a grout bag for walls, screw gun for faster screw installation, and a chalk line for long runs of tile, especially floors.
Step Three: Installing Your HardiBacker
This step in how to install ceramic tile is where you actually start doing some work! I know, I know the real work is dragging in all that tile, thinset, and hardibacker, but I digress.
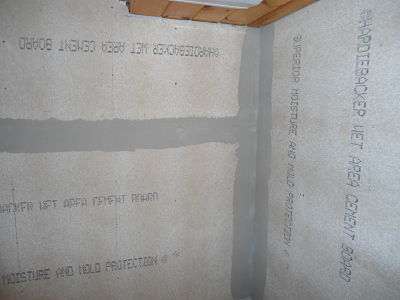
Now you start to install the backerboard. The backerboard is a mold and moisture resistant backing made to go over subfloors and walls. It's heavy, but not overly heavy, like the old school cement backerboards can be. I personally don't like using cement backerboard, like Durock, but that doesn't mean you cannot use it, it's a personal choice of mine.
There are different procedures
for walls and floors. The walls are
very easy while the floors require extra steps to ensure a long
lasting, quality installation.
Step Four:
Now that the backerboard is installed you can go onto getting the layout done so you can start setting tile.
The layout is one of the most important steps to get right. If the layout is off the corners may not line up, the tile may be crooked, and even worse all of the time and money spent may be for naught, as the tile may not live up to your expectations.
The layout is determined by your design, or pattern.Step Five:
Now that your layout is done you can start to stick the tile to the wall. This is also where you have to start cutting ceramic tile, on that page I show you what tools are best to cut tiles as well as how to use them.
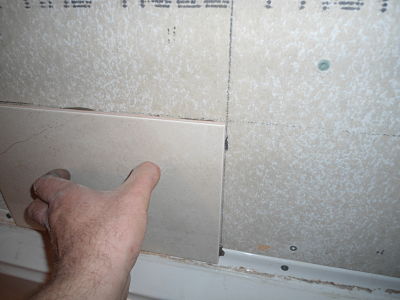
This may seem self explanatory, but there are some tricks I like to do. This is a page on how to install ceramic tile after all. For example, back-buttering the wall tile instead of smearing the thinset on the wall and making a big mess. The floors are different you simply dump out the thinset and push it around!
This is also where your spacers come in handy. Keep in mind most tiles do vary slightly in their dimensions, some more than others, and this requires some extra attention to keep the lines straight. This is also more of a problem with the larger tiles.
Now it's time to grout in this section of how to install ceramic tile. Grouting ceramic tile floors is very easy, grouting walls-not so much. This is where my tip of using a grout bag will save you time and aggravation.
Remember to not let the grout sit on the tile for any longer than necessary, as this will allow the grout to dry and you'll be stuck with the grout for a long time, if not forever.
Step Seven:
This step you simply buff the tiles with a soft cloth to remove the final haze. There will always be a slight haze no matter how much you wipe down the tiles while grouting.
Step Eight:
After the final buff, take a look at your new tile because it's done except for sealing the grout with a high quality sealer. I highly encourage sealing the grout lines especially the floor as it will get dirty over time by soaking in oils, dirt, and even cleaning chemicals.
Sealing must not be done for at least 7 days but most manufacturers recommend not sealing until 28 days after the installation is complete. This allows full cure time of the thinset and grout before sealing.
This page on how to install ceramic tile is covering only the basics. I will go into much greater detail when I explain each step individually on subsequent pages. Please stay updated by subscribing to my RSS feed.


Copyright 2012. All rights reserved.